Showing posts with label Blue. Show all posts

Monday, May 17, 2010

What do you call this shape?


I don't even know.

But I like it and I cut almost a hundred of them which puts me with a little over one hundred done. I need 240 I think. I cut until I ran out of steam a seam, so, I'll be heading to the quilt shop soon I think!
I can't wait to start putting blocks together!

Here's the link to my last post about my lovely Arcadia blocks and the fun pattern they will soon be :D

Happy quilting!


Saturday, December 19, 2009

Crazy 8!

Happy eighth day of Christmas!

Today's project is really quick and based off a little doll quilt. I don't know about you but my family likes to go caroling & take treats to friends during the holidays. These are what you take to the friends and family you really like! Great for In-laws or good friends the gift is a little tray but can be opened and hung as a wall hanging or mini table runner! Double gifts, woohoo! Who wouldn't love that?

Start with any festive little doll quilt
...or something just plain cute! Honestly the smaller the better I think, mine is big enough that the sides don't hold up as well as the small ones.
and 4 - 1/2" pieces of velcro

I wanted my sides to stand 2" tall so I stuck a pin at 2" from the corner on all sides.

Then sew a piece of velcro just outside the pin, and under the binding. Feels like a given but make sure you have one of each kind of velcro at each corner.

If the base is bigger than 5"-6" across you'll probably want to stabilize it with something. I know walmart sells cake boards (white cardboard essentially) that you can hold underneath it just so it's stays were it's supposed to.

Tada you're done!

Thursday, September 10, 2009

Jelly Rollin' Baby Blocks


I will be doing some different small projects I've found been meaning to try or have already done during this "Jelly Roll (end of the) Week"
*disclaimer~ My projects will not be made entirely of Jelly rolls but will utilize 2.5" strips so they will be jelly roll friendly. If you want you can call the Jelly Roll Friendly (end of the) Week but it just keeps getting longer and oh well! *

Today we have a project inspired by a Moda Bake Shop Tutorial (Sugar Cube Pincushion) I saw ages ago and wanted to adapt as toys for my little one.

My tutorial is a little different (mainly because I didn't have time to go search there's out :) ) and will give you an alternate method of construction if you don't feel like hand sewing the whole thing!

To start take your 2.5" strips and cut 6 squares of different, alternating, or the same fabric. Really doesn't matter whatever you think will look good!
I will be using 5 colors with the top and being the same color making up my 6 blocks.

You will want to cut 6 squares of heavy iron-on inter-facing that you will press to the back of your fabric squares. For your info that's a 15"x 2.5" strip of inter-facing.
As you can see I found this a good time to use oddly shaped, leftover pieces of interfacing :)

It's a good idea to mark the centers of your blocks at this point. just line up the corner of your ruler to 1.25" square and mark the corner.

Now line up your blocks like this with the top block in the center and the bottom block on top the rest are your sides.

Take the bottom block and add to the top of the formation and you'll have 2 strip sets ready to go!

Sew together each set and press open the seams!

You'll have 2 sets of 3 blocks.
Lay the end of one strip set against the center of the opposite set right sides together
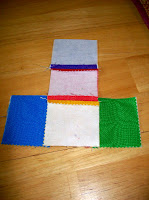
Make sure the sides of the top block overhangs the seams by approximately .25"

(line up your edges this is set back simply so you can see where it lines up)

Sew down the end seam you just lined up.

Turn the top & bottom strip sets to line up again

Continue sewing straight along the edge. (I would recommend using the down needle position on your corners and not taking your project off the machine at each corner. I only did that for better pictures.)

You'll turn the top again to continue down the side. Try to line up your raw edges at approx. 0.25" outside the seams as you're sewing.
You may notice that essentially we are sewing around the edge of the top strip set. I want you to continue like this until you have only one edge left and leave that unsewn. Do a short backstitch and take your little block off the machine!

Before you turn your block I suggest clipping the stitching at the corners to help them push out more sharply.

Turn your block right side out. Use your finger or a pencil to push the corners out well!
Stuff as desired.
Because I made mine a toy instead of a pincushion I added a rattle noise maker by taking a plastic case from some of those .25 cent toy dispenser toys and added a couple tiny jingle bells.
Closed it up and put it inside the stuffing!

You now have only a little bit of hand sewing to close up your block.

Do a blind stitch by sliding your needle in a tiny stitch on one side, then across and take a tiny stitch on the opposite side, and again go across and take a tiny stitch. If that doesn't make sense feel free to close it in whatever way you like :)

Next you'll add buttons for fun texture and to help it stay square in shape
I found it easiest to work on the three sides of a corner instead of going straight across from one side to the other since I don't have any 3" long needles. My regular needle worked just fine if I squeezed the centers I was working on together. Sew your buttons with a heavy thread or a quadruple threaded needle.
When you're through adding buttons, ribbons, or other decoration, knot it well under one of the buttons.
And there you have it!

A pincushion masquerading as a baby toy!
Make a few as a baby gift or pair with a handmade changing pad or burp cloths for a shower gift and very happy mother to be!


Monday, September 7, 2009

Gooseberries

I spent last week working on a "berry" fun project with a "Berry Delicious" Jelly Roll just like the one in the picture!


See it's "Jelly Roll Week" over at the Missouri Star Quilt Co.
They will be featuring several Jelly roll quilts and mine will be one of them! So I have been up to my eyeballs in berries and geese finishing up this fun little project!

It's now on it's way to the MSQC to be finished up and photographed :) While I work on the tutorial! Yes I did say tutorial :)
Hehe, it's coming!

I don't know if I reinvented the wheel on this one but I came across a great idea while searching for the perfect Jelly roll pattern and adapted the look for a great Jelly Roll friendly lap quilt! I'm calling it "Gooseberries" since I don't know of any other name. You can be watching the Cutting Table Blog and right here for more jelly roll updates, fun Jelly Roll quilts, and maybe a few fun projects!

Friday, August 28, 2009

Why are there teeth marks on my arm?

It's the grip of summer!
I swear!!! And a little school starting! LOL!
I've had to rip myself from it's jaws but it's ok, you can get excited now because today you get to see my first completed attempt at my own pattern!


Yay!! This is the full view of my "You Are What You Eat" quilt that I have hinted about before :) I know it's been a long time but it's so cute! I've really been enjoying this project! I'm now in the process of revising the directions and making another sample.
But I think we should all get to enjoy this! and I'm loving that you can see the 3D tail in this next shot!


This one is a close up of some stitching detail and my cute little giraffe's head :) He makes me smile :D big!

This has been so exciting, working on a project that I care so much about! Along with a major learning experience! And I'm still learning! I'm excited to be soon bringing this project to a close... if I can keep my nose out of to many swaps, other wips, and blog surfing, and other life events... HA! All I can say is I'll try :) and I can't wait to have my first patterns up and ready I've got about 5 in the works and ideas for more! Hurray!


Friday, August 14, 2009

How bout a little Snippets for your morning?

I've got a fabulous little thing going with some Snippets by American Jane

I love a work in progress!

Honestly, I'm not exactly sure how this is going to finish up. *blush* Do you ever do that? I've got the basic pattern worked out but I have lots of scraps left -


And I want it to be as large as possible, but I'm not sure if I'll be able to figure out a way to use all the little pieces to increase the size... hmm... we'll see!

I'm loving the polka dots in the fabric I've got the fabric all split into color groups mixed with all the polka dots! They're such happy colors!

The polka dots are going to be running trails through the quilt top though :) I'm so excited it should be pretty cute!