Showing posts with label Wonky. Show all posts

Thursday, October 28, 2010

Hello Friends!

How's it goin' at your house? I've been crazy busy prepping for a craft day at my church. Making costumes... that aren't finished yet. Stressing cause I lost a PIF... then excited cause I finally found it! I'm late on those by the way, how can someone be late when they have 365 days? Good question, I'll think about it.

In the meantime, here's a little pillow set I made out of some Valori Wells, Moda dots, and a few other pieces I can't remember the names of. By the way this is my first truly wonky quilted piece. What do you think?


I love the little birdie pillow. That's Katie Hennagir Designs, Chirp! for Robert Kauffman So cute! And now, it belongs to Catania :) Happy Birthday!


I don't know about you but I'm off to go wipe some runny noses and calm the crying hordes! Happy Sewing!


Friday, May 14, 2010

Little Red and Nicey Jane are on there way to Market

Ha if only.
That started as a childrens rhyme joke and then I capitalized Market and my brain went straight to Minnesota. I'm not even going to explain what the joke would have been it's just depressing now. At this point I may or may not be going to market, though it seems to be leaning towards not.
Sad huh.

On a happier note, let me show you my cute swap things.I made these for my wonderful swap friend. She's amazing and she was looking for some fun things for her home I chose a sewing machine cover and then threw together this Nicey Jane pillow. It wasn't one of her color combo choices but she had the color's in her inspiration pics and everyone loves Nicey Jane right?

Here's a close up of Little Red herself. I love it it's a drawing done by my very good friend Catania I think she could sell some of her artwork as embroidery patterns. She's great, so is Red.
I also love her gnome friends :) Tiny gnomes make life happier I think.

This is part of the swap gift I received. It's awesome!!! I don't know how I managed to get some one with just the right stash or maybe just the right fabric taste for me! But I now have several projects I want to do that involves finding some of the fabrics she used :) It's way to super cute! And the pillow she gave me was amazing (go check out all my pics on flickr then check out her's :) ) The front is adorable & the backs blue is perfect for my living room! She used a daisy chain fabric and a solid gray to pair it with on the back and I don't know how I got so lucky but it's really one of my favorites!

Last, I was asked about the mailbox I said I was building...
Well it killed my wrist, almost. I can still sew :) but here it is in all it's not perfectness what can I say but I'm sure glad I can still sew. I'm a lot better at that.If I could not sew we would be having some big issues. As it is, it only makes it hard to do push-ups which I'm not really sure I'm upset about :)


Saturday, December 19, 2009

Crazy 8!

Happy eighth day of Christmas!

Today's project is really quick and based off a little doll quilt. I don't know about you but my family likes to go caroling & take treats to friends during the holidays. These are what you take to the friends and family you really like! Great for In-laws or good friends the gift is a little tray but can be opened and hung as a wall hanging or mini table runner! Double gifts, woohoo! Who wouldn't love that?

Start with any festive little doll quilt
...or something just plain cute! Honestly the smaller the better I think, mine is big enough that the sides don't hold up as well as the small ones.
and 4 - 1/2" pieces of velcro

I wanted my sides to stand 2" tall so I stuck a pin at 2" from the corner on all sides.

Then sew a piece of velcro just outside the pin, and under the binding. Feels like a given but make sure you have one of each kind of velcro at each corner.

If the base is bigger than 5"-6" across you'll probably want to stabilize it with something. I know walmart sells cake boards (white cardboard essentially) that you can hold underneath it just so it's stays were it's supposed to.

Tada you're done!

Friday, September 11, 2009

Broken Breakfast!


Today's jelly roll project comes fresh from my little head.
This is my "Broken Breakfast" wall hanging.
I'm loving it! It's a mixture of regular and raw edge applique over a quilted background and so easy! As you wash this little wall hanging each applique strip will develop a soft fringe on one side for added texture! So cute!

My directions will give you a finished wall hanging of approximately 11x17
After all the trimming down :)
supplies~
12" x 18" piece of background fabric
14" x 20" piece of batting
14" x 20" piece of backing fabric
10 ~ 12" x 2.5" strips of fabric (applique)
approx. 60"+ of 2.5" fabric strips (binding)

Notes on choosing your fabrics ~ I stuck with 2 colors but feel free to choose a rainbows worth! If you're using a Jelly roll you will probably need 3 colors for the applique and you'll need to find 2 matching strips for the binding.

Start by quilting the background! Yay don't you feel like you're almost done already!
I simple did straight lines lining the presser foot up with the edge and then along the previous stitching line. These don't have to be perfect in fact considering the wonky nature of this project having your lines veer a little is a good thing!

When your finished trim you batting off if desired (I did mainly because I didn't want the extra bulk and my batting was slightly sticky from the use of a basting spray. By the way, first time I've used basting spray and I love it!)
Now it's time to break up your breakfast!
Tke those lovely little 12" jelly roll strips and lets make them wonky!
Lay your ruler over your strips making sure that you don't get any closer than 3/4" to the thinnest edge. I used the ruler to measure one end and the mat to make sure the other end didn't get closer than 3/4" Feel free to cut these strips a few at a time this helps your angles to not all be exactly the same.
This next step isn't strictly necessary but I laid out a few of my strips just to get a feel for what I was doing and the order of the chaos :)
I'll tell you what I saw when I did this, I saw that I wanted some pairs of fabrics and some singles, I took note to make sure I had wide and thin ends randomly on each side, I also wanted to make sure I was brave enough to have them be at odd angles! :D You might also note at this point that the straight cut edges are all to one side, these will be sewn down. The pinked edges also all face the same direction, these will be soft edge appliqued.
Next clear your quilted background and choose the placement of your first strip.
With the right side facing down against the quilt top stitch the strip down at .25" along the straight edge.
Iron to set the seam them flip your strip over press again and sew it down .25" from the raw edge. You just finished appliqueing your first piece!
continue adding strips taking care to make sure you put your strips on facing the same direction and not to sew over the raw edge parts of the strips.
You can see me here checking to make sure that my .25" seam allowance won't over lap my raw edges.
Sew the next piece down and continue in this manner over lapping is fine and great just make sure you over lap on the sewn edge. If you start at the bottom and go up this is the easiest way to get over lap. Starting in the middle like I did I found that going up overlapping was easier and going down making the background space between each was easier. (This is assuming that the raw edge hangs down) So, depending on which look you want more of I might recommend choosing your end and working straight across.

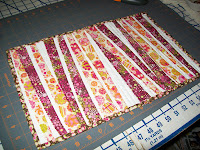
When you're through adding strips you'll have something to this effect.
Trim your edges
and prep your binding strips
Sew the binding on and voilá!

You've got a lovely little doll quilt, wall hanging, or heck at these dimensions it could be a place-mat or a table runner for your end table!

Enjoy!