
Showing posts with label Christmas. Show all posts

Tuesday, January 4, 2011

Christmas leftovers... of the non-food variety

I love getting rid of Christmas leftovers! My counters are clean and now my sewing table! Almost, here's the story :)
I've had this top for a year now. My mom made it last year and decided she didn't want it... I do! I love the shades of red and green in this fabric! I'm pretty sure it's mostly a line, but I honestly don't know which one.Feel free to help me out here if you recognize any fabric!
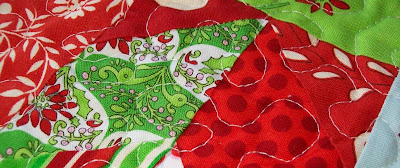
I got it before Christmas last year and it's been sitting in my to-do box since then till the beginning of last month I was going to finish it and have it on my table for Christmas this year! Well I basted it and then it sat on my table waiting, again :)

*Flash Forward*
(nice special effects, huh!)

I got up this morning and thought I'm gonna sew before my baby gets up! Well, what lay before me but the unfinished table topper...
Calling #3,655? ding! You're up!

It takes so little time to stipple a little topper! It makes me think, "Sheesh, why did that take so long?" Well, I finished that and went to get my binding and

I don't have any.

Dang.

Back to the box.


Thursday, December 24, 2009

Day 12 Giveaway! What did you think you missed something?

Hello!

My 12 days hit a train wreck this week!
Here's pics of what I did Mon & Tues! (hint: for some reason it's not sewing... hmmm.)
Pretty huh!

Yup, we had a surprise wedding this weekend! That I was lucky enough to be able to help plan and execute!
I have to say I'm pretty proud of this cake! It can definitely be improved upon but I think it came out pretty well. It was my first time using gum paste to make flowers. It was so fun!

Well that's what was happening early this week, instead of sewing,
but I have to show you the ball pattern that I still want to make for my little boy.
Yeah, definitely still want to make it :)
And don't you love the fabric combo used on Tadaa Studio's grab ball?!

It's adorable! I may be digging out a little more midwest modern!
It was going to be day 10 but seeing how that didn't work out, do you think there's still time?
It's not Christmas day yet. :D And only a few parties between here and there.

Next year when there isn't a wedding the week of christmas I'm definitely making those!


Anyway, Since you've made it this far in my wordy blog, I'll reward you!
(Do you feel like your reading one of those infomercial websites yet :) )

I said giveaway and I meant it!
How do 3 half yard cuts of Heather Ross sound... Merry Christmas to you, huh! hehe :)
I love many things Heather Ross and Far far away was no different.
I picked these up at market and now I'm sharing a few with you!
Included is the frog prince,
A wildflower piece,
And what far far away grouping would be complete without something as magical as a unicorn?
I also decided to throw in a couple of my leftover pieces of Anna Griffin's gorgeous Riley prints!
Hurray! Can you say bonus!
What do you do?
As expected comment to be entered & blog about this to get 3 extra entries!
Don't forget to come back and tell me so I can give you credit!
This will be open until the 31st I'll announce the winner sometime in the first week of January! Ooo, it's happy New year presents too! Yay!
One last thing, please make sure I have a way to contact you! Either leave your email or make sure you're not a no-reply (sometimes it happens and you don't even know it).

So, tell me, is it worth it to you for some way cute
free Heather Ross and Anna Griffin?

you tell me :D
Merry Christmas everyone! And a Happy New Year!


Sunday, December 20, 2009

9 fabric gift tags!

9 fabric gift tags... or will I need more?
Sheesh I think Christmas is the only time of year I come even close to disliking shopping! But with all those gifts we can't forget the wrapping and that means tags! Atleast for the pretty gifts :)

For your custom fabric gift tags take 1 light and 1 dark square of fabric adhere them together with a steam a seam type material to make double sided fabric.

Cut a 3"x6" piece of foil. Put steam a seam on the dull side of it.

from your double sided fabric cut a 2.5" circle.

Trim your foil to slightly thinner than your circle.

Give it decorative ends and fold it so the ends just grab the top of the circle. Iron in place.

Trim the foil top like an ornament hanger and voila, one down!

Can you see Santa's special tag?
Write on the light side to that special someone!


Saturday, December 19, 2009

Crazy 8!

Happy eighth day of Christmas!

Today's project is really quick and based off a little doll quilt. I don't know about you but my family likes to go caroling & take treats to friends during the holidays. These are what you take to the friends and family you really like! Great for In-laws or good friends the gift is a little tray but can be opened and hung as a wall hanging or mini table runner! Double gifts, woohoo! Who wouldn't love that?

Start with any festive little doll quilt
...or something just plain cute! Honestly the smaller the better I think, mine is big enough that the sides don't hold up as well as the small ones.
and 4 - 1/2" pieces of velcro

I wanted my sides to stand 2" tall so I stuck a pin at 2" from the corner on all sides.

Then sew a piece of velcro just outside the pin, and under the binding. Feels like a given but make sure you have one of each kind of velcro at each corner.

If the base is bigger than 5"-6" across you'll probably want to stabilize it with something. I know walmart sells cake boards (white cardboard essentially) that you can hold underneath it just so it's stays were it's supposed to.

Tada you're done!

Friday, December 18, 2009

On the 7th day of Christmas!


Ok, so I used both my 2 free days already... dang it!

And just so you know, I'm not going to tutorial on Christmas Eve either! and neither should you! go enjoy your families! Soooo.... Guess what that means?!?!?

A Christmas Eve Giveaway! Yay! Presents for Christmas is so appropriate anyway!

Yes, when you come back for the 12th day of Christmas there will be presents!
But, for today, we are all still making them :)
In fact, the next couple days will be in-law appropriate gifts! Hehe, we're leaving tomorrow for my husbands family christmas :) What a coincidence, huh!

Today we are making photo ornaments that are so much cuter than the plaster cheapo's you can pick up in any random photo center.
These ones could even be hung up with nothing in them and still be admired!

Materials -
Choose 3 charm squares for each ornament, a front, a middle, and a back.
1 gold colored charm square
2 - 5" square scraps of batting
1 - 2.5"x5" scrap of batting

Step 1 - Cut a 5" circle template with a 2.5" circle cut from the center.

Step 2 - Stack your fabric and batting in 2 stacks in the first place your back fabric (face down), 1 square of batting, and your middle fabric (face up). In the 2nd stack have your 2nd batting and your front fabric (face up).

Step 3 - Cut the stacks into 5" circles using your template.
Step 4 - take your gold colored square and fold it around the 2.5" piece of batting. Leaving the side opposite the fold pinked, cut from the fold strips 1 5/8" wide,
you can get up to 3 out of each charm square.
Step 5 - Trace the inside circle on the front ornament.
Step 6 - Sew around the circle you just drew twice. Sew around the outer edge of both circle stacks. Cut out the center of the small circle.
Step 7 - Attach a gold rectangle to the ornaments front circle, pinked side toward the ornament.
Step 8 - Stitch a rectangle approximately 1/2" thick and freehand a circle at the top.
Trim around the shape.
Step 9 - Your almost done place 2 pins about 2.5" apart at the top of your ornament and sew once around the bulk of the ornament. Leaving the 2.5" gap open.
Step - attach a 8-10" length of ribbon to the top of your ornament for hanging and put in a picture!More In-law happiness tomorrow!
I hope you're almost ready!! Maybe these will help :D