Showing posts with label Bag. Show all posts

Monday, May 23, 2011

It's Legen... wait for it... Dary!

So before Market I was a little crazy. I was going to be leaving for market a week before it started and I had to be totally ready and then make sure my family was ready for the 10 amazing days I would be gone! :) hehe, it was a happy crazy!

During that time I was lucky enough to get a sample bag pattern by the Tiny Seamstress to make and share with everyone at Quilt Market! Who doesn't love the job of sewing and being walking advertising! I was super excited! Well my good friends at the MSQC helped me find some great fabric and this is what we came up with for the Tiny Seamstress' "Legendary Bag" pattern!

So get ready for a little pattern review.
1) The instructions are very clear. There were very few things that I had to read twice.
2) Love the way she uses the contrasting fabrics. Check it out.
*I bought an extra 1/4 yard of fabric for the straps because I wanted the contrast but not as extreme as my inside contrasting fabric. I'm really happy with it.
3) Love all the pockets! You can tell a mom designed this bag. But not just any mom a trendy mom who likes to have her lip gloss, cell phone, and extras separated from the kids snacks, and little toys because no I don't carry a diaper bag but yes I still want to keep my kids happy :)
4) Her patterns are reasonably priced around $9 for some very custom looking stuff!

The only cons I've found so far are that I wish it had a closure. It wasn't as big a deal as I thought it would be because the straps really support the bag and keep things together but in general I'm a fan of some type of closure! Magnets, zippers, arguments, and relationships :) closure is good.

As a base I would totally feel comfortable recommending this pattern to friends and family and everyone. It's a large bag great for toting lots of stuff, very sturdy, and cute to top it off! Go check out her blog she's just announced her new spring line up and its all for sale at her shop! Don't forget to say hi from Hillary at Designing Happy!

I used It's a Hoot Trees in Fudge and Turquoise
and It's a Hoot Trees in Marshmallow and Banana
For my straps I bought Moda's Bella Solid Chocolate and Turquoise
Fusible fleece is my interfacing

Enjoy!


Monday, September 28, 2009

Halloween treats! mmmm...

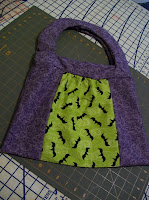
These are the Halloween treat bags that Hillary made.

This is the fabric that makes up the Halloween treat bags that Hillary made.


This is the tutorial that is used on the fabric that makes up the Halloween treat bags that Hillary made.


Supplies needed~
Main color - 1/2 yard
Center panel - 1/2 Fat Quarter contrasting color
Embellishments~
Black - 2 small 5"x5" squares
Batting - 5"x5"


Start with your center panel fabric and cut in half so you have 2-9x22" pieces. Trim selvages from one to make a 9"x21" piece.

Set the other strip aside. You will not need it for this bag.

From your main color cut 1- 5" strip the WOF. Sub cut into 2-21" strips. From the remaining fabric fold fabric in half (selvages down) and in half the other way so you have 8 thicknesses of fabric and 4 folds. Click here to print the pattern for the handle. Place on the fold & cut out as directed. After cutting out the pattern, cut through the indicated fold. Not both folds!


You should have 4 full handles with a cut through the center of the lower strip. Place 2 fabric pieces right sides together and sew along the outer edge & repeat. I would suggest serging or adding a zigzag to help secure the seams since kids can be pretty hard on these :) They should look like one of these. For your own reference I will be serging the edges of my treat bags.


Open both handles and place right sides of both pieces together and sew the side seams down


leaving the ends and edges that will be the rim and lower center front seams open


Put lower center seams right sides together and sew to form the rim of the bag.


Your handle and bag rim are finished! Press it flat and let's move on to the bag.


Sew 1- 5x21" strip to both sides of your center panel


Sew these seams 1/2" thick and finish the edges to secure them. (these bags are unlined)


Fold the bag right sides together vertically and sew side seams together at 1/2" thick again.

Pin the bag rim in place along the edge of the sewn bag, matching side seams. Pin the main fabric flat to the rim and find the center of the center panel and match that to the center seam.


Sew together, lightly gathering the center panel. Serge or zigzag the other rim edge.
Flip everything right side out.


Turn the inside rim edge under and topstitch around the seam catching the inside edge to hold it in place.


Add whatever embellishments you like :) I drew a little bat mirroring the fabric design and cut it out from my black fabric and batting made a quilt sandwich and free motioned stitched around the edge twice, then attached him to the bag by stitching him in place around the head and base of his wings.

Happy trick or treating!


Now it's your turn. These are the comments that are left by the people who liked the tutorial that is used on the fabric that makes up the Halloween treat bags that Hillary made.
Maybe will even get some picture links to people who've tried it and now have some seriously stylish kids ready to paint the town Halloween night!