Showing posts with label Jenean Morrison. Show all posts

Monday, August 29, 2011

Goodbye summer! *wave* ...now, let's sew!


There has been tons happening this summer unfortunately most of it has not been sewing! Bah. It's all crazy I think :) I did fix up a few pairs of jeans that had mysteriously gotten holes in the with some awesome Amy Butler, Jenean Morrison, and I think Riley Blake? OK I must be thoroughly ashamed of myself when I can't remember the designers of all the fabric in my stash. At least I still like them all and these... I love!
OK and serious awesomeness from friends, I posted these on the MSQC forums and someone mentioned having done something similar to lengthen there jeans as kids. Seriously... I love that! maybe even for me :) if the fabric were awesome enough. (I'm now dreaming of my coveted orange and turquoise Amy butler Belle Duck Egg Acanthus)
*sigh*

Oh well, in the mean time I took a great old bench I found, I know you all wish it was yours! Hehe, just wait! I took it from this...
to this!
Why you ask?
Well who doesn't love sitting on there front porch in an awesome turquiose vintage rocker? I do! Now I just want to add some awesome red polka dot pillows, so yeah, I've got plans.

And a little self bragging. Sorry. Shameless I know!
I made an amazing wedding dress this summer!
Check it out!

Yay! There are more pics at this amazing photographers site. (This wedding is all in august, maybe you can even search suzanne, but check it all out) Major eye candy there :) Aside from the dress!

Tuesday, September 22, 2009

Embellishing Jeans, Jenean Morrison Style!


At the beginning of the school year I did the traditional going through clothes ritual switching from one size to another going through boxes and preparing a huge stack of pants to be tightened, loosened, cutoff, etc. I came across one pair of jeans that has been hanging around through several children and they are just always the wrong size!
They fit the waist of my size 6 girl but the length is somewhere around a 4-5. Thinking they'd fit someone, sometime, they always get shoved off for another child (After all I have 5! Surely they'll fit someone, sometime!!)

Well no more!
This year as my stack of mending grew and I came upon this same pair of jeans and I decided to do something about them!

Using my lovely stash of Jenean Morrison downstairs I whipped up some adorable cuffs and a flower and decked out these never worn jeans into the new favorite pair of capris!

Of course, then Alayna got to help me out with a photo shoot and had a blast in the process! Seriously you have no idea how much giggling went into showing off these new capris!
Okay, well here's an idea :)

I've got the full tutorial up today over at the MSQC blog The Cutting Table!
Go check it out and leave me some love!


Sunday, September 20, 2009

A Breakfast of Fat Quarters for Kelly!


I'm thrilled to let everyone know that Kelly O. from has won the giveaway of my "Broken Breakfast" mini quilt and FQ's.


She left several sweet comments (I think she got one into every post! Go Kelly!) One in-particular left me blushing :D

I'm sending you a little Jenean Morrison Mingle and some Sandy Gervais Fresh Squeezed... we can't wait to see what you do with them! I hope you enjoy your prizes!

If you'd like to get a special handmade treasure for yourself

Sunday, September 13, 2009

Turning circles with our Jelly Rolls!


Jelly Roll Week is here!!!! Cruise over to MSQC and partake in the goodness that will be coming for us all! We should start getting jelly roll ideas later to day or tommorrw! If you don't yet have a jelly roll the daily deal is here to help us all find fantastic deals on jelly rolls, layer cakes, charm packs, patterns, etc. and word has it that soon there will be a free charm pack available on the daily deal site with only the $5 shipping to pay for your entire order!

Don't forget to enter my giveaway to win my "Broken Breakfast" mini quilt by commenting on any of my "Jelly Roll (end of the) Week" posts and/or blogging about them for more entries! The giveaway is open till September 20th! So comment away and share the fun! One entry per comment, One entry for blogging, only one of each kind per post!
Sew many entries! Sew little time!

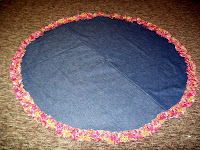
Of course, while your here enjoy a quick tute of a fabulously fun, little circular rug!
Supplies~

1 yard of Textured of base fabric
1 yard of Heavy upper base fabric
approx. 44-2.5" strips wof or Jelly roll strips
Basting spray


I'm gonna talk base fabric first. I chose random fabric that I simply had in my stash and I have a lot of random fabrics! I chose something textured for the bottom as this is likely going infront of a dresser in my daughters carpeted room. I chose a denim for the top because I had it, it was sturdy for light traffic, and it was dark so hopefully it will not look dirty to quickly.
You may choose whatever fabrics you like for your base.
You might consider
a piece of canvas,
or heavy drop cloth,
or a light, thrifted rug
(though I would try to avoid anything to thick for sewing purposes and without a plastic bottom.)
The idea is that it will be completely covered anyway!

Making the base~

Fold your fabric square into fourths and stack both pieces. Using a push pin and a length of ribbon that reaches from the folded corner to the raw edge pin the ribbon down to the folded corner of the fabric. Stretch the ribbon across and holding the ribbon and pencil to swing across the edge mark a quarter circle on the top layer of fabric

Use this as a guide to cut through all thicknesses of your base fabrics.

Lay your base circle's out right sides together with the wrong side of the heavy layer on the top. Pin around the edge and sew together leaving a small 4"-6" opening for turning.
Spray the wrong side of the heavy upper circle with basting spray and turn the base piece right side out smooth the circles out immediately so the basting spray can hold it correctly in place.

I did my fabric in circles of receding sizes. If using an actual Jelly roll I would reccomend a spiral pattern instead do this by simply curving in slightly as you aproach the end of the circle you are working on and continue following the edge never finishing a circle round till you reach the center. I recommend this because of the lack of matching fabrics in a typical jelly roll. Spiraling justs give a more scrappy look.

Add your ruffles~
Start by ironing your strips in half lengthwise and trimming the selvages from your jelly roll strips.

Sew your strip down as close to the outer edge of the upper base layeras you can (less than 1/4" from the edge), finger ruffling it slightly as you go.When you reach the end of one strip simply add another by butting the 2 raw edges together.
My outer row took approx. 4 1/2 strips.
If spiraling simply curve inwards slightly once you have made a full circle to the next row. If you're doing full color circles finish a row by ruffling your fabric and trimming it to meet the beginning of the row you were working on and doing a small backstitch.
Then simply scoot in and add another row. When you add your inner rows pull the ruffles from the outer row away from the fabric strip you're working with and line up the edge of the new strip with the sewing line of the first to get your placement spaced right. Continue in this manner adding circles or spiraling inward till you reach the center. For spiralling simply curve till you get there do a little backstitch and your done!
For circles you will take a scrap of one of your strips and using pinking shears cut out an approx. 2.5" circle. When you reach the center there should be a hole about the size of a quarter left to fill. Place your 2.5" circle directly over this space and do a little backstitched X in the center!
Hurray we're all done!

These are super cute and fun for a kitchen, bathroom, or bedroom depending on your jelly roll :)


Saturday, September 12, 2009

Candied flowers for my sweet!


I love jelly rolls and can't wait to see all the quilt projects the Missouri Star Ladies have come up with! Jelly Roll Week officially starts at the MSQC on the 13th!

Until then we will enjoy my little group of collected Jelly Roll projects and today we are making a versatile little jellied flower.
Perfect for little girls hair, a trendy sweater, or as I'll show you today children's clothing embellishments.

Supplies~
Jelly roll strip atleast 20" long
a round marking tool

Take your 2.5" strip and mark on it 5 scallops using your marking tool

Unless you are using a water soluble marking pen I would suggest marking on the back of your fabric. You'll want the rounded edge of your scallops atleast .25" from the top edge of the strip and the points between scallops should meet .75" -1" from the lower edge leaving plenty of room for the gathering stitches and closure.
Next using a highly contrasting thread color free motion stitch along your marked line twice.

don't let this free motion stuff scare you I'll show you a close up of mine
That's my good one, I like the wavy stitching it looks sketched on and cute, below is a bad one. My stitching got a little too wavy :)
You'll want to keep your fabric pretty stretched and taught as you do your free motion stitching. Because it's a single layer of fabric it will cinch up pretty tight if you don't keep it taught. Some cinching is ok as you can see :)

After you've double stitched the petals you'll need to trim off the excess by cutting close to the outer edge along the stitching. Do not cut through the stitching.
Along the straight edge sew a long basting stitch
Gather the flower as tightly as possible without breaking the threads, tie them off, and trim them.
Gather the petals right sides together with the gathered end sticking out the back and whip the end together to tighten the center hole.

Using a button large enough to cover the center raw edge sew down to the flower making sure all the center raw edge is well hidden.


Tie it off in the back.

It's now ready to apply to whatever project you have in mind!
I'm keeping mine mobile at the moment. It's simply pinned inside the pocket of these pants.

But I'd love it attached to a little head band or clip in my girls hair!

Keep in mind that these are not very washer friendly and while the double stitching will help them last they are only a single layer of fabric and are fairly flimsy so if attaching to clothes I would suggest pinning it or lightly tacking so it can be removed for washing. You could attach velcro to the back of the flower and to the article of clothing for a more permanent yet washable plan. Hehe, just brainstorming!