Showing posts with label Green. Show all posts

Tuesday, March 13, 2012

Hello My Friends!

Oh what a lovely hiatus! Sorry I didn't warn you! Truthfully I didn't even warn myself :) but I do have a short story to tell you!


Poor homeless things. They need a sign "will work for space"
I've lost my sewing room :( sad I know but it's for a good cause. We've got 2 Sister missionaries living in our basement now and 2 sewing machines living in the dining room! We're working on finding the sewing machines a new home but no good ideas yet. On the plus side the sewing machines are much more accessible! I can't say the same for the dining room table :) hehe! At least I know my husband loves me!


A little fabric love. Vintage Groove by Carolee McMullin for AdornIt!


But as always I'm working on lots of projects!

With St. Patty's day around the corner who knows what could happen!


Thursday, March 17, 2011

My Green Obsession


I've been playing with green for awhile now! This strip of aqua to green is the start of an awesome wonky doll quilt for the DQS10 to see the wonkiness all sewn together go check out my flickr! Or you can see it on the DQS10 page. It's coming along!

My Green obsession moved on from there to St. Patricks day! When I got to play with Anna Maria Horner for a little while!


Between the two of us we made quite a pile of fun little green flowers And when Heather Ross came to play the party was complete!

Each flower was topped with a vintage button and stuck in the hair of a leprechaun princess. At which time it waltzed off to school and I didn't get to take any pictures :( Thankfully I have one little princess who stays home and was happy to model her flower while she ate her green eggs for breakfast!
Of course she has to wait for the shamrock cookies and pot o' gold cupcakes! Inside the cupcakes they're rainbow! Go check out this awesome tutorial! So worth it!


Tuesday, January 4, 2011

Christmas leftovers... of the non-food variety

I love getting rid of Christmas leftovers! My counters are clean and now my sewing table! Almost, here's the story :)
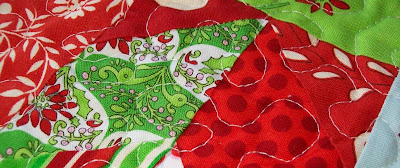
I've had this top for a year now. My mom made it last year and decided she didn't want it... I do! I love the shades of red and green in this fabric! I'm pretty sure it's mostly a line, but I honestly don't know which one.Feel free to help me out here if you recognize any fabric!
I got it before Christmas last year and it's been sitting in my to-do box since then till the beginning of last month I was going to finish it and have it on my table for Christmas this year! Well I basted it and then it sat on my table waiting, again :)

*Flash Forward*
(nice special effects, huh!)

I got up this morning and thought I'm gonna sew before my baby gets up! Well, what lay before me but the unfinished table topper...
Calling #3,655? ding! You're up!

It takes so little time to stipple a little topper! It makes me think, "Sheesh, why did that take so long?" Well, I finished that and went to get my binding and

I don't have any.

Dang.

Back to the box.


Monday, January 3, 2011

Still Designing! Still happy!

I've been thoroughly busy and thoroughly enjoying this holiday season! I am also thoroughly glad it's over! My husband kissed me at midnight on New Year's Eve and I swear at that moment a weight was lifted off my shoulders!
I could look around and think clearly. I have no deadlines pushing in on the year yet. I'm learning to be a mom to my boy (this is a total adjustment, and I'm still figuring it out... it'll probably be that way forever :) ) and I felt the need to do things I enjoy again! It was so wonderful the New Year seemed to have washed away all the stress that had been hanging around for the last 6 months or so!
Seriously starting mid September through, well, January (and even March if you include my birthday, but we don't really want to do that!) is birthday/ Holiday season at our house. Don't ask me why I planned it that way. I didn't. But every 2-3 weeks starting in September someone is havin' a party whether it's a birthday or a Holiday! It's fun but totally crazy!

Anyway here's some sewing sneak peeks of what's been happening during the last little while!
Sunshine thoughts in this project :)
Lots of embroidery love here!
And this is a snippet of a pillow that inspired a new pattern idea!
(Now we have to see if I can get it written down. The problem is definitely not a lack of ideas!)
Anyway there will be more to come! There have been presents made and crafts that are super fun to play with!
But for now, here's one of my little sweeties,
wishing us all a Happy New Year!
I hope it's filled with friends and fun and sewing and peace (and quiet :) ) and all your grand plans fall into place for a magnificent 2011!


Friday, August 20, 2010

Sew many distractions!


Summer is officially over according to the school calendar :) and I'm quite excited to be home with my 2 little people underfoot. I've done a little sewing recently, along with some roller coaster riding, anniversary celebrating (in-laws :) ), party planning, landscaping, phone shopping (haven't bought one yet), and preparing for school.
Sewing was by far my favorite.
(Roller coasters might be in the running too, shhh... )

I have a couple things I'm pretty excited about, first
-I'm finally making progress on my pif! I'm using every bit of my 365 days *blush*
-I did a great little embroidery for my in-laws for their anniversary! Along with 280 reasons we love them! It was their 40th anniversary so we did 40 reasons (or close to that amount :) ) we love them from each of the grandkids. They're all scrolled up behind a snap closing pocket on the back of the embroidery.
-And last this is a swap block I made a dozen of on the last day of summer!
They are a pattern of my own design. They had to go together quickly and I think I'm going to keep working on the pattern to fine tune it but I like the colors and design!


Tuesday, March 30, 2010

Simplified... in reverse!


I had to laugh the other day when I saw Camille's post Gray because at that very moment I had several cans of green and gray paint sitting in my kitchen to help me take a break from my sewing! And help me it did!
I painted the main portion of the walls this fantastic green and have a planned gray wall at the end of the kitchen, of course, I changed my mind on the color of gray after the first stripe! Oops! You can see some of my gray thoughts in the pic at the top *blush*
My favorite thing about the kitchen redo are these fantastic red pendant shades. That and the simplification that comes when you clear out a room and then have to decide what's going back in :)
Look I even found a place for my new hostess apron to hang and smile at me!So, even though I'm reverse of Camille I still love the combo of the gray and green colors! We can definitely say Camille Roskelley is inspiring on so many levels! And hey, check out the little birdie that will hopefully be living on my lovely green wall very soon. It's part of the fun color strips I showed you from my mini quilt retreat! It's been growing in design since we got home and I took a break from painting :)


Sunday, December 20, 2009

9 fabric gift tags!

9 fabric gift tags... or will I need more?
Sheesh I think Christmas is the only time of year I come even close to disliking shopping! But with all those gifts we can't forget the wrapping and that means tags! Atleast for the pretty gifts :)

For your custom fabric gift tags take 1 light and 1 dark square of fabric adhere them together with a steam a seam type material to make double sided fabric.

Cut a 3"x6" piece of foil. Put steam a seam on the dull side of it.

from your double sided fabric cut a 2.5" circle.

Trim your foil to slightly thinner than your circle.

Give it decorative ends and fold it so the ends just grab the top of the circle. Iron in place.

Trim the foil top like an ornament hanger and voila, one down!

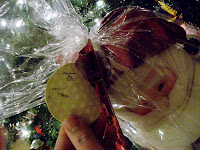
Can you see Santa's special tag?
Write on the light side to that special someone!


Thursday, December 10, 2009

Poinsettia's - Day 1


I found my Camera!!!!
Yay!
I've been searching for it since the 14th of November after the baptism of my daughter ...my camera was left in the church building.

I couldn't take anything but phone pics of my sis boom blocks and now my phone is dying and I can't even get those off.
My fireplace has been torn out of the wall since the week of thanksgiving, we're "fixing it" It will be better but at the moment it doesn't feel like it :)
I traced a gorgeous embroidery pattern out to do before Christmas and then left it in MO at Sarah's quilt shop. She's now embroidering it. Ah, sisters :) Yes that smiles still pasted on there :D

So I'm terribly sorry I've been so missing in action things, as they say, have been crazy. though I'm sure they could have been worse. The happy things recently?

My little son turned 1


I cried, and my husband started a job after 10 and 1/2 months of unemployment.


I'm thinking we Celebrate!
How about a twelve days of Christmas from the stash!
I like these I think I work best under pressure :D
Now my stash is fairly limited, lots of precuts not so much on the yardage but a little.
I also have mostly girls but I will be trying to force out a boy thing or two and I'll be doing mostly Christmas gifts and projects since that's what we (I) need right now! there are currently 14 days until Christmas so I get 2 days off.... hopefully I'll make those Christmas and Christmas eve :D

To start, I've been working on this silly flower for a week now
and by working I mean watching it sit on the ironing board spreading guilt and frustration because it's not done yet so today I'm finishing it!

You all basically know how to make one of these I'll assume.
Very basic steps, say them with me know, Cut a template, cut the leaves & petals, stack & sew!
Very good people!
OK, now for the quirks of my particular flower.
I cut a five point template that I used for the green leaves and the top 2 layers of petals. It's a bad pick but the template has 3 1/2" long petals. I traced the template onto the green once and twice on the red then stitched around it three times each, I then free handed a smaller template in the same style (not perfectly!) for the center petal set.
After cutting them all out, I did a running stitch from the center end of the petal to about an inch from the tip and gathered it just slightly to give a little texture.I stacked the flower with the leaves at the base, then the ungathered large petals, the gathered large petals, and last the small petals.
I sewed them together with a pile of ribbon french knots. Pull the ribbon through from the base.
bring your needle around so its pointing toward the ribbon going out of the fabric and wrap the needle 1-3 times depending on the thickness of the ribbon and how fat you want your knots. I wrapped mine twice.
Then go back through the fabric almost in the same place as where you came out.
Continue until you have a pile of french knots filling the center of your flower. If desired attach a clip, safety pin, clasp, velcro, or whatever to the back of your flower and enjoy a little wearable Christmas spirit! I'm showing mine on the scarf my daughter wanted this for :) And there you have it Poinsettia's for the Christmas season or to stuff a stocking with!
Merry first day of Christmas!