I will be doing some different small projects I've found been meaning to try or have already done during this "Jelly Roll (end of the) Week"
*disclaimer~ My projects will not be made entirely of Jelly rolls but will utilize 2.5" strips so they will be jelly roll friendly. If you want you can call the Jelly Roll Friendly (end of the) Week but it just keeps getting longer and oh well! *
Today we have a project inspired by a Moda Bake Shop Tutorial (Sugar Cube Pincushion) I saw ages ago and wanted to adapt as toys for my little one.
My tutorial is a little different (mainly because I didn't have time to go search there's out :) ) and will give you an alternate method of construction if you don't feel like hand sewing the whole thing!
To start take your 2.5" strips and cut 6 squares of different, alternating, or the same fabric. Really doesn't matter whatever you think will look good!
I will be using 5 colors with the top and being the same color making up my 6 blocks.

You will want to cut 6 squares of heavy iron-on inter-facing that you will press to the back of your fabric squares. For your info that's a 15"x 2.5" strip of inter-facing.
As you can see I found this a good time to use oddly shaped, leftover pieces of interfacing :)

It's a good idea to mark the centers of your blocks at this point. just line up the corner of your ruler to 1.25" square and mark the corner.

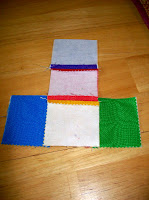
Now line up your blocks like this with the top block in the center and the bottom block on top the rest are your sides.

Take the bottom block and add to the top of the formation and you'll have 2 strip sets ready to go!

Sew together each set and press open the seams!

You'll have 2 sets of 3 blocks.
Lay the end of one strip set against the center of the opposite set right sides together

Make sure the sides of the top block overhangs the seams by approximately .25"

(line up your edges this is set back simply so you can see where it lines up)
Sew down the end seam you just lined up.

Turn the top & bottom strip sets to line up again

Continue sewing straight along the edge. (I would recommend using the down needle position on your corners and not taking your project off the machine at each corner. I only did that for better pictures.)

You'll turn the top again to continue down the side. Try to line up your raw edges at approx. 0.25" outside the seams as you're sewing.
You may notice that essentially we are sewing around the edge of the top strip set. I want you to continue like this until you have only one edge left and leave that unsewn. Do a short backstitch and take your little block off the machine!

Before you turn your block I suggest clipping the stitching at the corners to help them push out more sharply.

Turn your block right side out. Use your finger or a pencil to push the corners out well!

Stuff as desired.

Because I made mine a toy instead of a pincushion I added a rattle noise maker by taking a plastic case from some of those .25 cent toy dispenser toys and added a couple tiny jingle bells.

Closed it up and put it inside the stuffing!
You now have only a little bit of hand sewing to close up your block.
Do a blind stitch by sliding your needle in a tiny stitch on one side, then across and take a tiny stitch on the opposite side, and again go across and take a tiny stitch. If that doesn't make sense feel free to close it in whatever way you like :)

Next you'll add buttons for fun texture and to help it stay square in shape

I found it easiest to work on the three sides of a corner instead of going straight across from one side to the other since I don't have any 3" long needles. My regular needle worked just fine if I squeezed the centers I was working on together. Sew your buttons with a heavy thread or a quadruple threaded needle.
When you're through adding buttons, ribbons, or other decoration, knot it well under one of the buttons.

And there you have it!
A pincushion masquerading as a baby toy!

Make a few as a baby gift or pair with a handmade changing pad or burp cloths for a shower gift and very happy mother to be!


Such a great idea for a baby toy! I love the shaker idea too, so clever. (and green!) I'll bet your boy loves it too!
ReplyDeleteI made something similar but used parts of an old chew toy that had had it's day and sewed them on (rings, teethers, ribbon,etc) instead of buttons--either way they turn out to be a fun toy for baby!
ReplyDeleteGreat idea!
ReplyDeleteVery cute! Love the buttons in the centers. I like the idea of putting the jingle bells in those little toy bubbles. I have the hardest time getting those things open so they would be great inside a baby toy.
ReplyDelete